Are you practicing Zero Downtime Deployment in your company?
In software development, updates and changes in source code to release new features or fix some problems happen frequently. But the problem is our customers can’t risk having any downtime, as this period offline can be harmful to their revenue, customer loyalty… Concern regarding downtime is one of the major reasons that companies may be hesitant about implementing changes to their applications and services, including minor updates.
This is where zero downtime deployment (ZDD) comes in. Companies can launch new versions of their applications and services without having any downtime during this process.
In this article, I will examine four approaches to achieving Zero downtime deployment with Terraform.
The following prerequisites are necessary to proceed:
- AWS Knowledge: A basic understanding of the AWS cloud platform is recommended as the examples will be deployed on AWS.
- Terraform: This tool will be used to define and provision sample AWS resources.
- Ansible: This tool will be used for application deployment on the provisioned infrastructure.
What is Zero Downtime Deployment?
Zero downtime deployment(ZDD) is the practice of keeping services always running and available to customers, even during software updates.
A successful Zero Downtime Deployment (ZDD) ensures users experience minimal disruption during system updates. This is achieved by delaying the release of updated code or configuration changes to the web server until the entire deployment process is finalized. In other words, users continue to interact with the existing system version while the update unfolds seamlessly in the background.
Continuously running successful Zero downtime deployment is an essential part of maintaining the company’s reputation with customers. This is because customers expect applications to be up and running 24 hours a day, 7 days a week, 365 days a year. On the other hand, they also expect applications to work efficiently without any bugs. This is why ZDD is so important.
Lifecycle customization for Zero Downtime Deployment
By default, Terraform will work following this flowchart.
![[Tekos_Do you know about Zero Downtime Deployment work?] Terraform performs when generating an execution plan for new deployment](https://tekos.net/wp-content/uploads/2024/06/image-1.png)
The terraform apply command checks the terraform.tfstate file to determine the current state of deployed resources. If there are any differences between the current state and the configuration defined in the Terraform code, terraform apply will make the necessary changes. This may involve updating existing resources, destroying outdated resources, or deploying new resources entirely.
Consider a resource that provisions an AWS instance that starts a simple HTTP server on port 80.
resource "aws_instance" "instance" {

  ami           = "ami-0008d82c26490343a"

  instance_type = "t3.small"

  user_data = <<-EOF

#!/bin/bash

mkdir -p /var/www && cd /var/www

echo "App v${var.app_version} new version" >> index.html

python3 -m http.server 80

 EOF

}
When you modify the image property of an existing resource in your Terraform configuration and run the Terraform plan, it will identify a planned change. This plan will show that Terraform intends to destroy the existing resource with the old image and then create a new one with the updated image you specified.
The reason for this is that It is not possible to update this particular attribute of a resource and Terraform needs to remove the existing instance. Terraform’s default behavior during an update is to follow a “destroy-then-create” approach. It first destroys the existing resource based on the Terraform state and then creates a new resource with the updated configuration. This can lead to downtime during the update process. In a production environment, this would cause undesirable downtime.
![[Tekos_Do you know about Zero Downtime Deployment work?] Terraform default behavior](https://tekos.net/wp-content/uploads/2024/06/image.png)
To avoid downtime, the ‘lifecycle’ meta argument allows you to customize the resource lifecycle. The ‘lifecycle’ configuration block lets you set three flags controlling the resource.
- Create_before_destroy: This flag is used to ensure the replacement of a resource is created before the original instance is destroyed.
- Prevent_destory: This flag provides extra protection against the destruction of a given resource.
- Ignore_changes: Customize how diffs are evaluated for resources, allowing individual attributes to be ignored through changes.
These three flags let you override the default behavior for resource creation.
The create_before_destroy flag within the lifecycle meta-argument modifies Terraform’s behavior during force-new updates. When set to true, Terraform provisions the new resource first, ensuring its successful creation before destroying the existing resource. This minimizes downtime associated with the update.
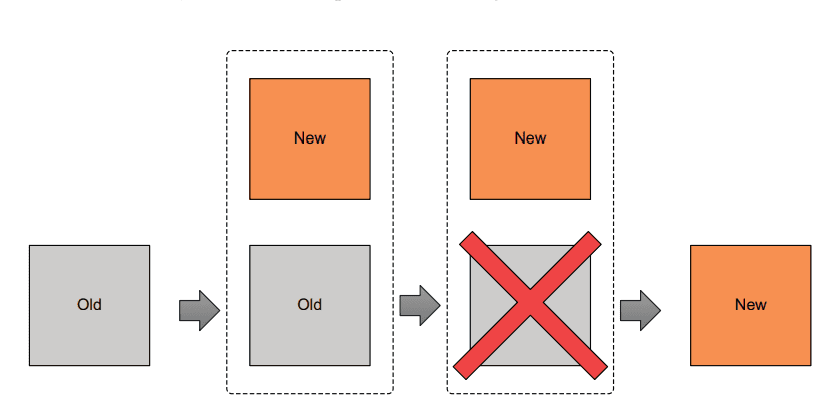
A new snippet of code is modified:
resource "aws_instance" "instance" {

  ami           = "ami-0008d82c26490343a"

  instance_type = "t3.small"

  lifecycle {

    create_before_destroy = true

  }

  user_data = <<-EOF

#!/bin/bash

mkdir -p /var/www && cd /var/www

echo "App v${var.app_version} new version" >> index.html

python3 -m http.server 80

  EOF

}
Even with create_before_destory is applied, the new instance is ready before destroying the old. It does not mean the application is available to serve requests. Terraform is not aware of your application lifecycle and depending on type and complexity, this could be some minutes after Terraform has created the instance.
We can circumvent this limitation by taking advantage of resource providers. Terraform does not declare resource successfully created until the provisioner has completed, so we can run the application health check script during this time. Therefore, the destruction of old resources will be delayed until the new resource has been created and is capable of serving requests. We will use this trick to achieve Zero Downtime Deployment.
resource "aws_instance" "instance" {

  # ….

  lifecycle {

    create_before_destroy = true

  }

  provisioner "local-exec" {

    command = "bash -c './healthcheck.sh ${self.public_ip}'"

  }

}
Based on the technology and complexity of the application, the healcheck script can be different. We can simply understand this script will perform some requests to the server and wait for the server until the response with status code 200. Terraform marks the provisioner as executed.
Considerations when this method is approached
Even though It is easy to apply to achieve ZDD with create_before_destroy, It has a number of shortcomings that we need to consider.
Support: This flag create_before_destory is only supported by resources, It means terraform module can not apply it.
Resource conflict: Because new and old resources must exist at the same time, naming resources should be careful to avoid conflict. Even some resources should be unique such as an S3 bucket, so this approach is impossible.
Creation: Not all attributes will force to creation of new resources. Terraform can update some attributes directly (without destroying and recreating the resource). It means create_before_destroy does not work. We can take RDS as an example, when the DB instance type is updated, there is no destruction but the server will stop temporarily to update.
Actually, I do not use create_before_destroy as I have found it to be more trouble than it is worth.
Side resources deployment
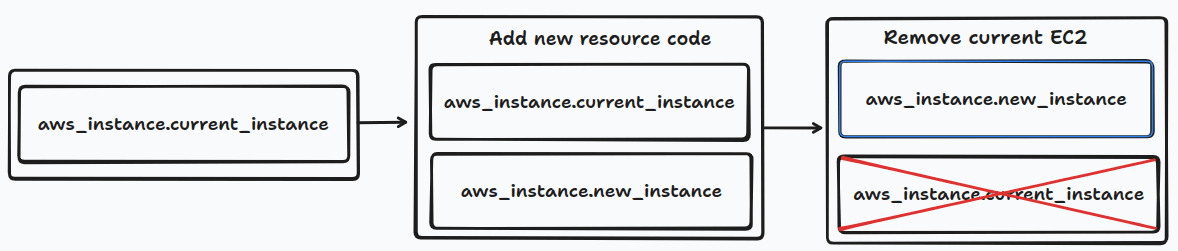
This approach is the same as lifecycle customization, instead of utilizing a built-in flag from Terraform. We will manually add a new block of resources and wait for it to be ready. Then we just need to remove the old resource code and run ‘terraform apply’ again.
I can provide you with a general template using the create_before_destroy flag and some best practices for provisioning two instances during an update:
resource "aws_instance" "current_instance" {

  ami           = "ami-0008d82c26490343a"

  instance_type = "t3.small"

  user_data = <<-EOF

#!/bin/bash

mkdir -p /var/www && cd /var/www

echo "App version 1" >> index.html

python3 -m http.server 80

 EOF

}

resource "aws_instance" "new_instance" {

  ami           = "ami-0008d82c26490343a"

  instance_type = "t3.small"

  user_data = <<-EOF

#!/bin/bash

mkdir -p /var/www && cd /var/www

echo "App version 2" >> index.html

python3 -m http.server 80

 EOF

}
Then we remove the current instance when the app is ready.
Following this approach, we can be flexible to apply all resources that we want, even apply it to Terraform modules.
Because this approach needs to delete the source code of old resources when the new version is available, we need to be careful to name the identifier. The name of the new resource should be easy to identify to avoid mistakes when removing old resources.
Blue/green deployment
Blue/green deployment is another approach to achieve zero downtime deployment when the latest version of an application is released. It is old, but It is still an effective and popular way to achieve ZDD.
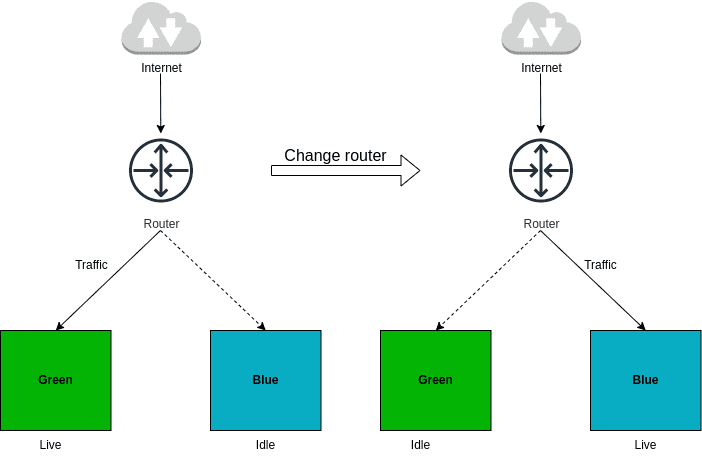
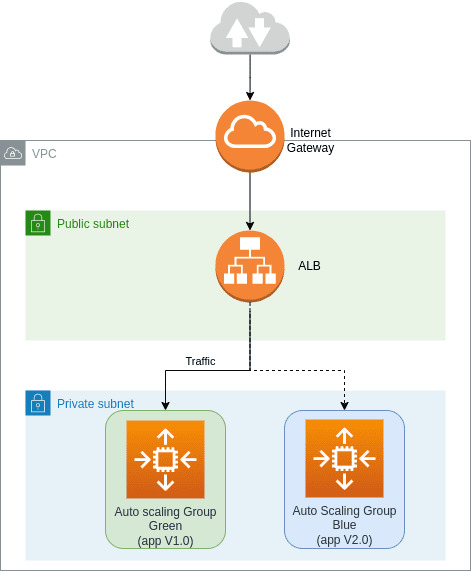
In order to apply Blue/Green deployment, we need to have two servers, one is blue, and the other is green. Only one of them will serve the traffic to the production environment which is in a live state, the other will be in an idle state. To switch servers between blue and green, we need to have a router. This router directs traffic to the live server and can be a load balancer or DNS resolver.
When you want to deploy the new version of the software, you first deploy it to an idle server. Then, software is ready, you will switch the router from pointing live server to the idle server.
The process of moving from one server to another, known as cutover, can be achieved in two ways: through automation or by performing the steps manually. Upon completion of the cutover, the previously idle server running the latest software becomes the active server, while the former active server transitions to an idle state.
Architecture
Go back to Blue/Green deployment, we need to prepare two servers and use a router to switch between them.
I will divide the above architecture into two parts, including base and application. In Terraform, “base infrastructure” refers to resources that you don’t change between deployments. These resources are the foundation that both your blue and green environments (different versions of your application) can share. Think of it like the plumbing and electrical wiring in a house – they stay the same regardless of which furniture you put inside.
The application layer comprises resources subject to change during deployments. The application is designed to allow the destruction and recreation of these resources without affecting the system’s overall functionality.
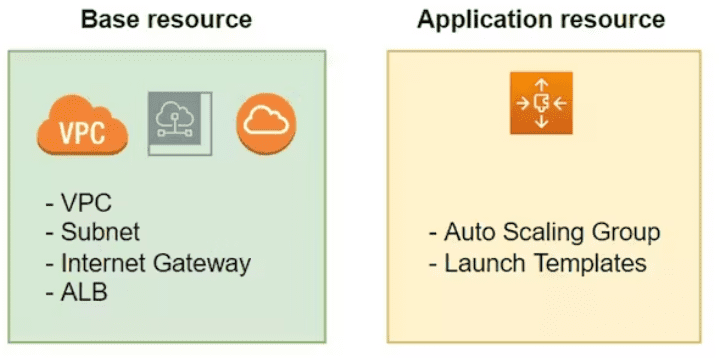
The reason I define the architecture as two parts is I just need to touch application resources to switch the pointer from the idle server to the live server.
Code
We will deploy on AutoScaling Group an application version 1.0 and consider it as Green. The other AutoScaling Group deployed application version 2.0 and called it Blue. Green will be a live server, while Blue will be idle. Then, I will cut over from Green to Blue so that Blue will become a live server. Now, the User will get the response from the application with version 2.0. The component interactions are illustrated in Figure 6. We will create a main.tf file and add the below code.
provider "aws" {

 region = "us-west-2"

}

variable "production" {

 default = "green"

}

module "base" {

 source = "terraform-in-action/aws/bluegreen//modules/base"

 production = var.production

}

module "green" {

 source = "terraform-in-action/aws/bluegreen//modules/autoscaling"

 app_version = "v1.0"

 label = "green"

 base = module.base

}

module "blue" {

 source = "terraform-in-action/aws/bluegreen//modules/autoscaling"

 app_version = "v2.0"

 label = "blue"

 base = module.base

}

output "lb_dns_name" {

 value = module.base.lb_dns_name

}
After running ‘terraform apply’, application version 1.0 on the green will be available to the end user.

Blue/Green cutover
Now, we are ready to switch from Green to Blue, Blue is running application version 2.0. To execute cutover, we need to change the Load Balancer target group point to the Blue environment by changing var.production on the above source code.
…

variable "production" {

 default = "blue"

}
We need to run terraform apply again, this action just takes a few seconds to complete.
The load balancer endpoint will remain unchanged during the update (referred to as “green”). Users may need to refresh their browser to see the updated version. From the user’s perspective, the transition to the new version will occur without any perceived downtime.

Consideration
The infrastructure currently has two instances provisioned. However, only one is actively in use, while the other remains idle and available for use. So we can save money by scaling down instance size when not needed. Then we will scale up it before It becomes the live server.
Combine Ansible and Terraform to reach zero downtime deployment
No matter which deployment strategy you choose (blue/green, canary, rolling updates, etc.), Terraform can handle provisioning both the infrastructure and application components. It comes up with a question “Is it good to apply Terraform for both infrastructure and application layer ?”.
Before answering the question, I visit the official Terraform document to have a look at Terraform’s definition.
This reference clarifies that Terraform functions as an infrastructure as code tool. In this role, Terraform focuses on managing infrastructure resources to ensure their successful deployment. Terraform does not manage applications running within the provisioned servers. That is why in lifecycle customization I have to use ‘provisioner’ to check the application. So the answer is no, Terraform is not a good tool to manage applications.
That is why we need to combine Terraform with other tools to manage applications running inside the server. I will choose Ansible which is the most common tool for configuration management to combine with Terraform to achieve Zero Downtime Deployment. The workflow consists of two distinct phases.
- Provision a VM or a fleet of VMs with Terraform.
- Run ansible playbook to configure the machine and deploy the application.
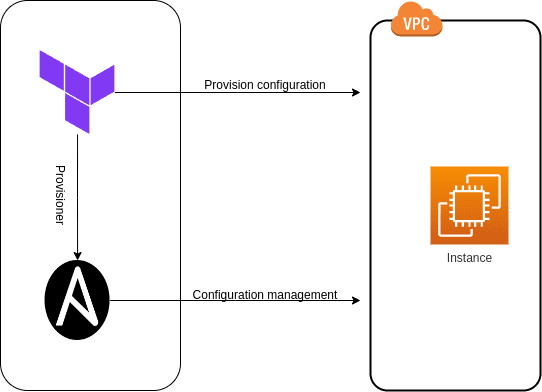
For this scenario, we are going to provision an EC2 Instance with Terraform.
The instance will come pre-installed with Ansible and configured for SSH access using a Terraform-generated key pair. When The instance is up and running, we deploy the application on it through Ansible.
Infrastructure deployment
Ansible needs to connect to the remote server through SSH so we need to generate an SSH key pair, then use it for instance configuration.
provider "aws" {

  region  = "eu-west-3"

}

resource "tls_private_key" "key" {

  algorithm = "RSA"

}

resource "local_file" "private_key" {

  filename          = "${path.module}/ansible-key.pem"

  sensitive_content = tls_private_key.key.private_key_pem

  file_permission   = "0400"

}

resource "aws_key_pair" "key_pair" {

  key_name   = "ansible-key"

  public_key = tls_private_key.key.public_key_openssh

}

Of course, We need to open port 22 on instance to allow SSH connection, and port 80 for application as well.

data "aws_vpc" "default" {

  default = true

}

resource "aws_security_group" "allow_ssh" {

  vpc_id = data.aws_vpc.default.id

  ingress {

    from_port   = 22

    to_port     = 22

    protocol    = "tcp"

    cidr_blocks = ["0.0.0.0/0"]

  }

  ingress {

    from_port   = 80

    to_port     = 80

    protocol    = "tcp"

    cidr_blocks = ["0.0.0.0/0"]

  }

  egress {

    from_port   = 0

    to_port     = 0

    protocol    = "-1"

    cidr_blocks = ["0.0.0.0/0"]

  }

}

And now we can configure the EC2 instance.

data "aws_ami" "ubuntu" {

  most_recent = true

  filter {

    name   = "name"

    values = ["ubuntu/images/hvm-ssd/ubuntu-focal-20.04-amd64-server-*"]

  }

  owners = ["099720109477"]

}

resource "aws_instance" "ansible_server" {

  ami                    = data.aws_ami.ubuntu.id

  instance_type          = "t3.small"

  vpc_security_group_ids = [aws_security_group.allow_ssh.id]

  key_name               = aws_key_pair.key_pair.key_name

   provisioner "remote-exec" {

    inline = [

      "sudo apt update -y",

      "sudo apt install -y software-properties-common",

      "sudo apt-add-repository --yes --update ppa:ansible/ansible",

      "sudo apt install -y ansible"

    ]

    connection {

      type        = "ssh"

      user        = "ubuntu"

      host        = self.public_ip

      private_key = tls_private_key.key.private_key_pem

    }

  }

  provisioner "local-exec" {

    command = "ansible-playbook app.yml -u ubuntu --key-file ansible-key.pem -T 300 --ssh-common-args='-o StrictHostKeyChecking=no' -i '${self.public_ip}',"

  }

}

The remote-exec is the same as local-exec, except it first connects to the instance and executes these commands inside it. For sure, we use local-exec on this example, ansible needs to be installed on the local machine.

Now, we need to create a sample playbook to install the nginx service on the instance.

---

- name: Install Nginx

  hosts: all

  become: true

  tasks:

  - name: Install Nginx

    apt:

      name: nginx

      state: present

  - name: Add index page

    template:

      src: index.html

      dest: /var/www/html/index.html

  - name: Start Nginx

    service:

      name: nginx

      state: started

And add an HTML file.

<!DOCTYPE html>

<html>

<style>

    body {

        background-color: green;

        color: white;

    }

</style>

<body>

    <h1>green-v1.0</h1>

</body>

</html>
Finally, we ran terraform apply and got the below result.
Application deployment with zero downtime
The application deployment typically happens independently, potentially triggered by a CI pipeline. To simulate an application change, I will modify index.html as below.
<!DOCTYPE html>

<html>

<style>

    body {

        background-color:blue;

        color: white;

    }

</style>

<body>

    <h1>blue-v2.0</h1>

</body>

</html>
The Ansible playbook allows you to directly update the application configuration without needing to change the underlying infrastructure components. You can simply run the playbook manually for quick configuration adjustments.
![[Tekos] Blue/Green cutover](https://tekos.net/wp-content/uploads/2024/06/image-6.png)
Now I will execute ansible-playbook command.
ansible-playbook -u ubuntu --key-file ansible-key.pem -T 300 -i '13.37.255.158,', app.ymlAfter executing this command, I quickly get the new version of the application.
![[Tekos] Blue environment when combining Terraform with Ansible.](https://tekos.net/wp-content/uploads/2024/06/image-3.png)
Now, we have done this sample deployment with a combination of Terraform and Ansible. Thanks to Ansible, we don’t have to focus 100 percent on Terraform to achieve Zero Downtime Deployment anymore, Ansible will share the responsibility for the application layer. Terraform will focus only on the infrastructure layer and that is the main purpose of this tool.
Zero downtime deployment, the conclusion
Zero downtime deployment is not easy to achieve, the software still exists with really small downtime on these strategies. It is difficult to make it perfect, but we try to make downtime as small as we can to avoid affecting the user experience.
For each project, the approach to updating software will be different. It will depend on current architecture, budget, technology,… So we need to carefully choose the strategy of deployments to match with the project.
- Create_before_destroy is a custom flag from the Terraform lifecycle block. It will change Terraform’s default behavior to create new resources and then destroy old resources. It is easy to have resource conflict on this one.
- Blue/Green deployment is a good strategy to follow. We can easily switch from the old server to the new server.
- Terraform + Ansible will divide the deployment into two stages, Terraform will mainly focus on infrastructure, and Ansible will care about the application.
The next article will discuss the more advanced deployment strategy to achieve zero downtime deployment. Would you like to read more articles by Tekos’s Team? Everything’s here.
References
– Book: Terraform in Action, by Scott Winker
– Terraform provisioned: https://developer.hashicorp.com/terraform/language/resources/provisioners/syntax
– Zero Downtime Update with Hashicorp Terraform: https://www.hashicorp.com/blog/zero-downtime-updates-with-terraform
– Terraform Blue/Green Development: https://devopsvn.tech/terraform-series/terraform/bai-11-terraform-bluegreen-deployment
– Ansible with Terraform: https://devopsvn.tech/terraform-series/terraform/bai-13-ansible-with-terraform