
How to write clean React code?
React developers want to write cleaner, simpler, and more readable code. In this article, we will explore 7 ways you can start writing cleaner React code and make building React projects and reviewing your code much easier.
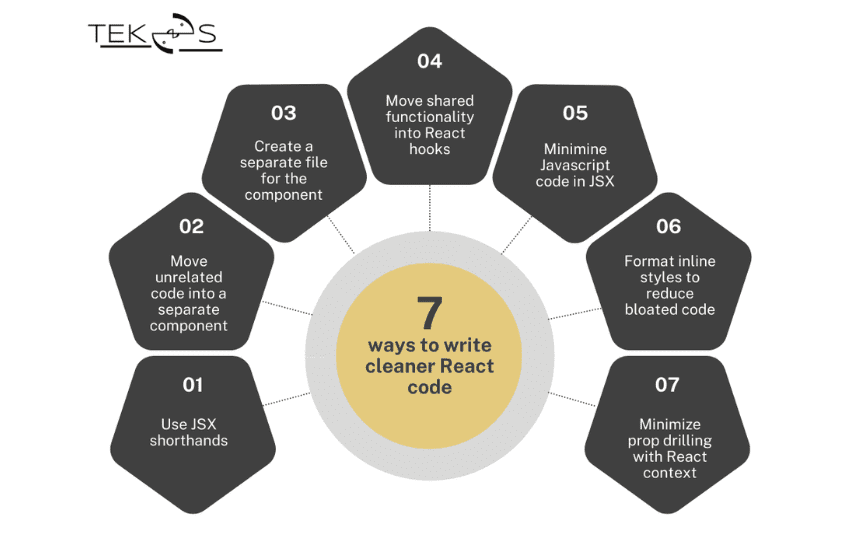
Use JSX shorthands.
How do you pass a true value to a given prop? In the example below, we use the show title prop to display the app title in the Navbar component.
// How do you pass a true value to a given prop?

export default function App() {
   return (
       <main>
           <Navbar showTitle={true} />
       </main>
   );
}


function Navbar({ showTitle }) {
   return <div>{showTitle && <h1>My Special App</h1>}</div>;
}
Here, we don’t need to explicitly set showTitle as a Boolean true. A useful shorthand to remember is that any provided prop on a component defaults to true. So, we only need to add the showTitle prop on Navbar, and the title element will be displayed.
// Add the showTitle prop on Navbar.

export default function App() {
   return (
       <main>
           <Navbar showTitle />
       </main>
   );
}


function Navbar({ showTitle }) {
   return <div>{showTitle && <h1>My Special App</h1>}</div>;
}
Another useful shorthand is when you pass a prop value as a string, you don’t need to wrap it in curly braces. For example, if you set the title of the Navbar with the title prop, you can simply place its value in double quotes.
String props don’t need to be wrapped in curly braces in React because they are treated as plain string literals, whereas other types of props need to be wrapped in curly braces to indicate that they should be interpreted as JavaScript expressions.
// Another useful shorthand.

// src/App.js

export default function App() {
 return (
   <main>
     // shouldn't
     <Navbar title={"My Special App"} />

      // should
     <Navbar title="My Special App" />
   </main>
 );
}


function Navbar({ title }) {
 return (
   <div>
     <h1>{title}</h1>
   </div>
 )
Move unrelated code into a separate component.
The easiest and most important way to write cleaner React code is to abstract our code well into separate React components.
Consider the example below. Our app displays a Navbar component. We loop through Posts with the map() method and display their titles on the page.
// Abstract our code well into separate React components.

// src/App.js

export default function App() {
   const posts = [
       {
           id: 1,
           title: 'How to Build YouTube with React',
       },
       {
           id: 2,
           title: 'How to Write Your First React Hook',
       },
   ];

   return (
       <main>
           <Navbar title="My Special App" />
           <ul>
               {posts.map((post) => (
                   <li key={post.id}>{post.title}</li>
               ))}
           </ul>
       </main>
   );
}

function Navbar({ title }) {
   return (
       <div>
           <h1>{title}</h1>
       </div>
   );
}
Is there a cleaner way to do this? Why not move the code we’re repeating (displaying the posts) into a separate component, which we’ll call FeaturedPosts?
// Is there a cleaner way to do this?

// src/App.js

export default function App() {
   return (
       <main>
           <Navbar title="My Special App" />
           <FeaturedPosts />
       </main>
   );
}

function Navbar({ title }) {
   return (
       <div>
           <h1>{title}</h1>
       </div>
   );
}

function FeaturedPosts() {
   const posts = [
       {
           id: 1,
           title: 'How to Build YouTube with React',
       },
       {
           id: 2,
           title: 'How to Write Your First React Hook',
       },
   ];

   return (
       <ul>
           {posts.map((post) => (
               <li key={post.id}>{post.title}</li>
           ))}
       </ul>
   );
}
As you can see, we only need to consider the components within the App: Navbar and FeaturedPosts.
Create a separate file for the component.
Continuing with the example above, we are currently keeping all the components in one file, app.js. Similarly to how we abstracted code into separate components to make our application more readable, to make files in our application more readable, we will also put each component into a separate file.
This will help us to keep each file responsible for only one component, which will prevent confusion when using and reusing components in our application.
// Make files in our application more readable.

// src/App.js
import Navbar from './components/Navbar.js';
import FeaturedPosts from './components/FeaturedPosts.js';

export default function App() {
   return (
       <main>
           <Navbar title="My Special App" />
           <FeaturedPosts />
       </main>
   );
}
// Make files in our application more readable.
// src/components/Navbar.js
export default function Navbar({ title }) {
return (
<div>
<h1>{title}</h1>
</div>
);
// Make files in our application more readable.

// src/components/FeaturedPosts.js

export default function FeaturedPosts() {
   const posts = [
       {
           id: 1,
           title: 'How to Build YouTube with React',
       },
       {
           id: 2,
           title: 'How to Write Your First React Hook',
       },
   ];

   return (
       <ul>
           {posts.map((post) => (
               <li key={post.id}>{post.title}</li>
           ))}
       </ul>
   );
}
Additionally, by separating each component into its own file, we will avoid having one overly cumbersome file.
The smaller a component is, the easier it can be reused by other components. But if it is too small, there will be too many files. So, I think the developer should consider whether to split an element into a component or not when it is reused by another element/component to avoid duplicated code.
Move shared functionality into React hooks.
Consider the FeaturedPosts component, suppose instead of displaying static post data, we want to fetch post data from an API.
// Fetch post data from an API.

// src/components/FeaturedPosts.js

import React from 'react';


export default function FeaturedPosts() {
   const [posts, setPosts] = React.useState([]);


   React.useEffect(() => {
       fetch('https://jsonplaceholder.typicode.com/posts')
           .then((res) => res.json())
           .then((data) => setPosts(data));
   }, []);

   return (
       <ul>
           {posts.map((post) => (
               <li key={post.id}>{post.title}</li>
           ))}
       </ul>
   );
}
However, what happens if we want to make this request for data across multiple components? Suppose in addition to a FeaturedPosts component, we want to create a Posts component with the same data. We would have to copy the logic we used to fetch our data and paste it into that component. And to avoid having to do that, why don’t we use a new React Hook that we can call useFetchPosts:
// Use a new React Hook that we can call useFetchPosts.

// src/hooks/useFetchPosts.js

import React from 'react';

export default function useFetchPosts() {
   const [posts, setPosts] = React.useState([]);

   React.useEffect(() => {
       fetch('https://jsonplaceholder.typicode.com/posts')
           .then((res) => res.json())
           .then((data) => setPosts(data));
   }, []);

   return posts;
}
Once we have created this hook, now we can reuse it in any component we want.
// Can reuse it in any component.

// src/components/FeaturedPosts.js

import useFetchPosts from '../hooks/useFetchPosts.js';

export default function FeaturedPosts() {
   const posts = useFetchPosts();

   return (
       <ul>
           {posts.map((post) => (
               <li key={post.id}>{post.title}</li>
           ))}
       </ul>
   );
}
Minimize JavaScript code in JSX.
The less JavaScript code in JSX, the better. For example:
// The less JavaScript code in JSX.

// src/components/FeaturedPosts.js

import useFetchPosts from '../hooks/useFetchPosts.js';

export default function FeaturedPosts() {
   const posts = useFetchPosts();

   return (
       <ul>
           {posts.map((post) => (
               <li
                   onClick={(event) => {
                       console.log(event.target, 'clicked!');
                   }}
                   key={post.id}>
                   {post.title}
               </li>
           ))}
       </ul>
   );
}
Here, we are handling a Click event on a Post. You can see that the JSX becomes much harder to read. To solve this, we can extract the function in the onClick event into a separate handler function and name it handlePostClick.
// Move onClick function to separate handler named handlePostClick.

// src/components/FeaturedPosts.js

import useFetchPosts from '../hooks/useFetchPosts.js';

export default function FeaturedPosts() {
   const posts = useFetchPosts();

   function handlePostClick(event) {
       console.log(event.target, 'clicked!');
   }

   return (
       <ul>
           {posts.map((post) => (
               <li onClick={handlePostClick} key={post.id}>
                   {post.title}
               </li>
           ))}
       </ul>
   );
}
Now, the code is much clearer. In this example, it is just one line of code (the console.log one), we may not see the real advantages of separating Javascript code. But, imagine with 10 lines of code, it would mess up our JSX code.
Javascript is about the logic and JSX is about the react components, the UI. Separate them to make it clearer.
Format inline styles to reduce bloated code.
A common pattern for many React developers is to write inline styles directly in JSX. Because inline styles are direct and easier for developers. However, once again, this makes our code not only harder to read but also harder to overwrite/modify. It could create inconsistencies that you have to handle manually.
For example, if a style is with !important you might have weird behavior if you try to use higher level theming for example with body.darkTheme or body.lightTheme. The !important inline styling will take precedence over the dynamic higher-level styling which might not be ok.
//The !important inline styling will take precedence.

// src/App.js

export default function App() {
   return (
       <main style={{ textAlign: 'center' }}>
           <Navbar title="My Special App" />
       </main>
   );
}

function Navbar({ title }) {
   return (
       <div style={{ marginTop: '20px' }}>
           <h1 style={{ fontWeight: 'bold' }}>{title}</h1>
       </div>
   );
}
We should convert inline styles to CSS stylesheets. Then, we can import it into any component we want. And there is a simple way to rewrite your inline styles by organizing them into Objects. For example:
// Should convert inline styles to CSS stylesheets.

// src/App.js
export default function App() {
   const styles = {
       main: { textAlign: 'center' },
   };

   return (
       <main style={styles.main}>
           <Navbar title="My Special App" />
       </main>
   );
}

function Navbar({ title }) {
   const styles = {
       div: { marginTop: '20px' },
       h1: { fontWeight: 'bold' },
   };

   return (
       <div style={styles.div}>
           <h1 style={styles.h1}>{title}</h1>
       </div>
   );
}
Even though the CSS approach matches more with the consistency approach in styling, code reuse, and separation of concerns (structure, styling, logic), we should not ignore the component approach in some cases.
In general, it is recommended to use CSS for most of the styling needs of a web page and to reserve inline styles for small, one-off adjustments.
Minimize prop drilling with React context (or any state management libraries like Recoil, Redux).
Another essential pattern to use for your React projects, especially if you have common properties that you want to reuse across multiple components, is to avoid passing down props repeatedly from parent to child components, known as prop drilling. Instead, you can use React Context, a feature built into React.
For example, if you want to share user data across multiple components, you can wrap your entire application in a component provider. Then, pass userData down as the value prop and use that context in the individual components with the use context hook, like in the Navbar and FeaturedPosts components.
// Use React Context, a feature built into React.

// src/App.js

import React from 'react';

const UserContext = React.createContext();

export default function App() {
   const user = { name: 'Reed' };

   return (
       <UserContext.Provider value={user}>
           <main>
               <Navbar title="My Special App" />
               <FeaturedPosts />
           </main>
       </UserContext.Provider>
   );
}

// src/components/Navbar.js

function Navbar({ title }) {
   const user = React.useContext(UserContext);

   return (
       <div>
           <h1>{title}</h1>
           {user && <a href="/logout">Logout</a>}
       </div>
   );
}

// src/components/FeaturedPosts.js

function FeaturedPosts() {
   const posts = useFetchPosts();
   const user = React.useContext(UserContext);

   if (user) return null;

   return (
       <ul>
           {posts.map((post) => (
               <li key={post.id}>{post.title}</li>
           ))}
       </ul>
   );
}- Context Provider: Context Provider is a built-in feature of React that allows you to pass data down the component tree without having to pass props through every level. It uses the dependency injection container design pattern. It is a simple and lightweight solution for managing the global state. Context API allows you to create a context object and wrap your components with a provider that passes down the state to all the nested child components that consume it. It is easy to use and perfect for small to medium-sized applications.
- Redux: Redux is a popular state management library for React that provides a predictable state container. It allows you to manage the application’s global state in a centralized store that can be accessed by any component in the application. Redux uses actions, reducers, and stores to manage the state, and it is a great option for large-scale applications where the state management is complex. However, it has a steep learning curve and can be difficult to set up initially.
- Recoil: Recoil is a newer state management library for React that provides a simple and flexible way to manage the state in your application. It allows you to manage state as atoms, which are units of state that can be shared across components. Recoil also provides selectors that allow you to derive computed state from your atoms. It is lightweight and easy to use, making it a good option for medium to large-sized applications.
Conclusion
Overall, the choice of state management solution depends on the specific needs of your application. If you need a simple and lightweight solution, Context Provider may be the best option. Redux may be a good choice if you are working on a large-scale application with complex state management. Recoil could be a good option for a more flexible and lightweight alternative to Redux.
References
– You might not need Redux: https://medium.com/@dan_abramov/you-might-not-need-redux-be46360cf367
– Redux vs Recoil:https://udara.io/redux-vs-recoil
– 7 ways to write cleaner react code today: https://dev.to/reedbarger/7-ways-to-write-cleaner-react-code-today-16do